

A DIY dog crate can be an excellent solution when providing a cozy sanctuary for your furry friend. Not only does it offer a secure and comfortable space for your dog to relax, but it also adds a touch of style to your home. This article will guide you through creating a unique dog crate that suits your dog’s needs and complements your interior decor. So roll up your sleeves, and let’s get started!
Table of Contents
- Choosing the Right Materials and Measurements
- Building Your DIY Dog Crate
- FAQs (Frequently Asked Questions)
- Q: Can I customize the crate design to match my home’s interior style?
- Q: Are there any safety considerations I should consider during construction?
- Q: How can I make the crate more comfortable for my dog?
- Q: Can I use recycled materials for the DIY dog crate?
- Q: How can I train my dog to become accustomed to the crate?
- Conclusion:
Choosing the Right Materials and Measurements
Selecting Sturdy and Pet-Friendly Materials
When building a DIY dog crate, choosing durable, safe, and pet-friendly materials is essential. Opt for sturdy wood or metal that can withstand your dog’s playful nature. Avoid using materials with sharp edges or toxic substances that could harm your furry companion.
Taking Accurate Measurements
Before diving into the construction process, take precise measurements of your dog’s size and the available space in your home. Consider your dog’s height, length, and width to ensure a comfortable fit inside the crate. Remember to account for extra space that allows your dog to move around and stretch comfortably.
Building Your DIY Dog Crate
Step 1: Designing the Crate Structure
Start by sketching a blueprint of the crate design that suits your preferences. Determine the dimensions and consider features such as a removable top, side doors, or a built-in feeding station. Let your creativity shine through, and tailor the design to your dog’s specific needs.
Step 2: Gathering the Tools and Materials
Gather all the necessary tools and materials once you have your design in place. This may include wood panels, screws, hinges, a saw, a drill, sandpaper, and paint or stain for a polished finish. Having everything at hand will streamline the construction process.
Step 3: Constructing the Crate Frame

Begin by assembling the crate frame according to your design. Cut the wood panels to the required dimensions and use screws to secure them in place. Ensure the structure is sturdy and well-supported, as it will be the foundation of the crate.
Step 4: Adding Doors and Vents
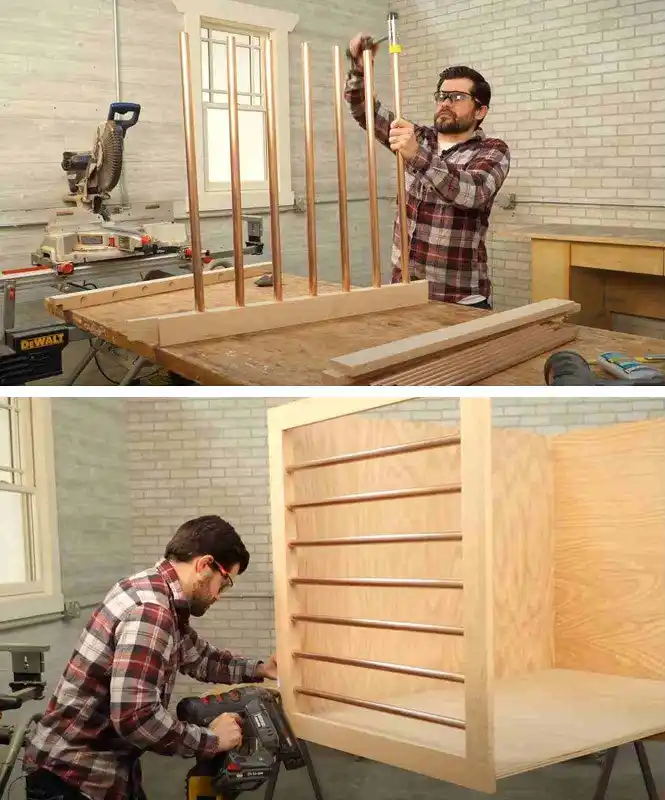
Next, attach doors to the front or sides of the crate. These doors will allow easy access for your dog while providing ventilation. Consider adding mesh or slats to ensure proper airflow and visibility. Install hinges that allow the doors to swing open and close smoothly.
Step 5: Sanding and Finishing Touches
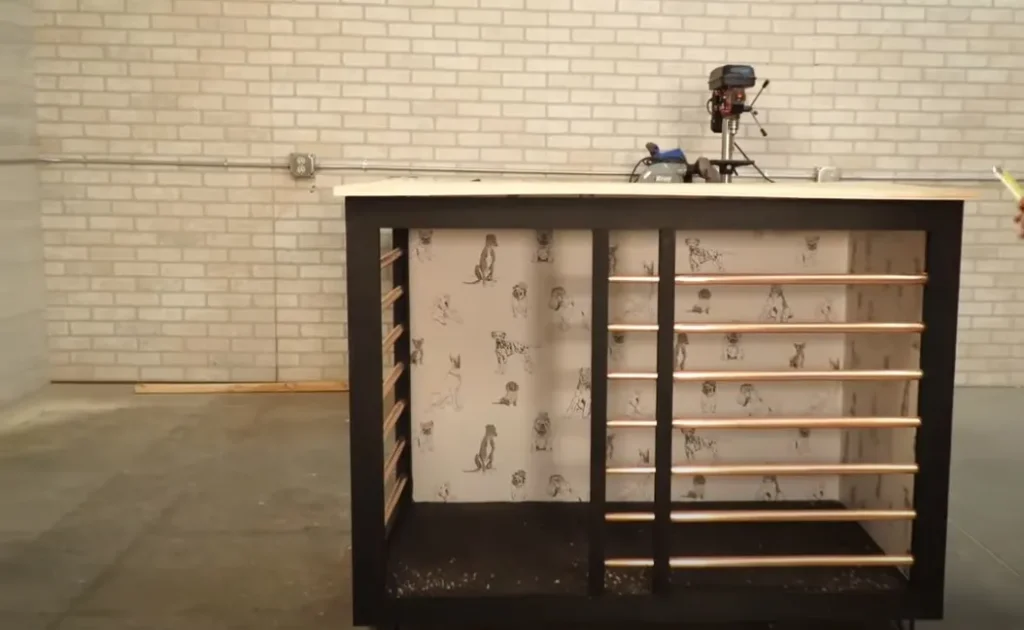
To create a polished and pet-friendly surface, sand down any rough edges or surfaces. Smooth the wood with sandpaper, paying extra attention to corners and edges. Once sanded, choose a pet-safe paint or stain to enhance the aesthetics and protect the wood from wear and tear.
Step 6: Personalizing the Crate
Add personal touches to make the crate feel like a home for your furry companion. Consider including a soft and cozy bed, blankets, or cushions that match your interior decor. You can also hang toys or place a water bowl within easy reach.
More Details – Family Handyman
FAQs (Frequently Asked Questions)
Q: Can I customize the crate design to match my home’s interior style?
A: Absolutely! The beauty of a DIY dog crate is the ability to personalize it according to your home’s decor. Choose colors, finishes, and accessories that align with your interior style.
Q: Are there any safety considerations I should consider during construction?
A: Safety is always a priority when building a dog crate. Ensure that all edges and surfaces are smooth and free from splinters to prevent any injuries to your dog. Avoid using toxic materials or finishes that could be harmful if chewed on. Additionally, ensure the crate is stable and securely constructed to prevent accidents or collapses.
Q: How can I make the crate more comfortable for my dog?
A: There are several ways to enhance the comfort of the dog crate. Adding a soft bed or mattress provides a cozy spot for your furry friend to relax. Including blankets or cushions can also add extra warmth and comfort. Consider incorporating a crate cover or curtains to create a den-like atmosphere that promotes a sense of security.
Q: Can I use recycled materials for the DIY dog crate?
A: Absolutely! Using recycled materials can be an eco-friendly and cost-effective option. Ensure the materials are sturdy enough to provide your dog with a safe and secure environment.
Q: How can I train my dog to become accustomed to the crate?
A: Crate training is a gradual process that requires patience and positive reinforcement. Start by introducing your dog to the crate with the door open, allowing them to explore it at their own pace. Gradually encourage your dog to spend short periods inside the crate, rewarding them with treats or praise. Over time, increase the duration of crate time, always ensuring that it remains a positive and comfortable experience for your dog.
Conclusion:
Building a DIY dog crate provides a comfortable and secure space for your furry friend and allows you to showcase your creativity. Following the steps outlined in this guide and considering your dog’s needs, you can construct a personalized crate that complements your home’s style. Remember to prioritize safety, choose pet-friendly materials, and add those special touches to make the crate a cozy retreat for your beloved companion. So go ahead, unleash your DIY skills, and create a dog crate that your dog will adore!
Now, you have a comprehensive guide for your DIY dog crate project. Enjoy crafting a special place for your canine companion while adding a touch of style to your home.


Hi my family member I want to say that this post is awesome nice written and come with approximately all significant infos I would like to peer extra posts like this