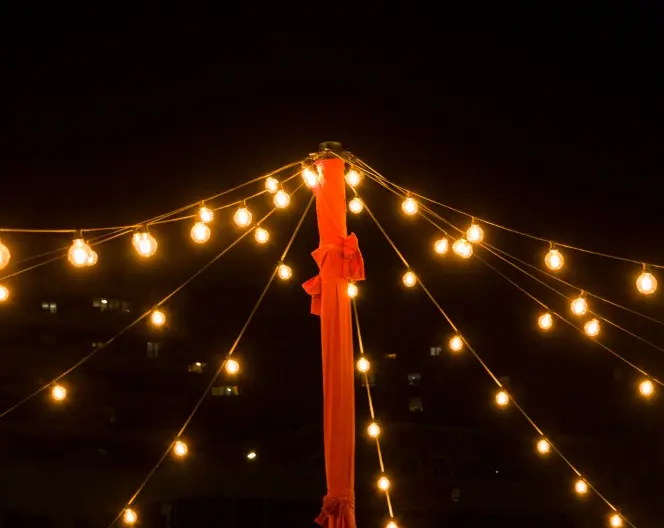
When it comes to creating a captivating atmosphere in your outdoor space, few things are as enchanting as string lights. Whether you’re hosting a backyard gathering, planning a romantic evening under the stars, or want to add a touch of charm to your outdoor decor, string lights can work wonders. However, the cost of commercial-grade string light poles can be quite steep. But fret not! This article guides you through a step-by-step process to create your own cheap and stylish DIY string light pole.
Table of Contents
Materials You’ll Need
Before diving into the DIY process’s nitty-gritty, let’s gather the materials required for this project. Make sure you have the following items on hand:
- 4×4 pressure-treated wooden post (8 feet in length)
- Quick-setting concrete mix
- Galvanized metal pole bracket
- Eye bolts and washers
- Outdoor string lights
- Screwdriver
- Level
- Measuring tape
- Shovel
- Optional: Decorative elements like paint or rope for a personal touch
Step-by-Step Guide
Now that we have our materials ready let’s get started on creating your very own DIY string light pole:
Step 1: Choose the Perfect Spot

To begin, select an ideal location in your outdoor space where you want to set up the string light pole. Consider the area’s dimensions, proximity to power sources, and any potential obstructions that may interfere with the lighting effect.
Step 2: Dig the Hole
Dig a hole approximately 2 feet deep at the chosen spot using a shovel. Ensure that the hole is wide enough to accommodate the wooden post securely.
Step 3: Install the Wooden Post
Place the 4×4 wooden post into the hole, ensuring it stands straight and upright. Use a level to ensure it is perfectly vertical. Once aligned, pour the quick-setting concrete mix into the hole, filling it around the post. Follow the manufacturer’s instructions for the specific drying time required.
Step 4: Attach the Pole Bracket
After fully dries the concrete, it’s time to secure the pole bracket. Attach the galvanized metal pole bracket to the top of the wooden post using screws and a screwdriver. Ensure that the bracket is firmly fixed to support the weight of the string lights.
Step 5: Mount the Eye Bolts

Measure equal distances from the top of the pole bracket and screw in the eye bolts. These eye bolts will serve as anchor points for attaching the string lights. Use washers to secure them tightly.
Step 6: String the Lights

Now comes the fun part! Unroll your outdoor string lights and start threading them through the eye bolts. Weave the lights back and forth, creating a beautiful pattern and ensuring they are taut. Continue until you have reached the desired length or coverage for your space.
Step 7: Optional Decorative Touches
This is the perfect opportunity to add a personal touch to your DIY string light pole. Consider painting the wooden post in a color that complements your outdoor decor. You can also wrap the decorative rope around the pole for aesthetic appeal.
FAQs
Q: Can I use different types of poles for this project?
A: Absolutely! While we recommend using a 4×4 pressure-treated wooden post, you can explore other options, such as metal poles or PVC pipes, based on your preference and the overall look you want. Just ensure that the chosen pole is sturdy enough to support the weight of the string lights.
Q: Are there any safety considerations I should keep in mind?
A: Safety is paramount when working with electrical components. Ensure that the string lights you use are suitable for outdoor use and are designed to withstand various weather conditions. Additionally, ensure all electrical connections are secure and moisture-free to prevent any potential hazards.
Q: Can I customize the height of the string light pole?
A: Certainly! If you prefer a taller or shorter string light pole, you can adjust the length of the wooden post accordingly. Just remember to maintain stability and ensure that the pole can support the weight of the lights.
Q: How do I secure the string lights at the end?
A: Once you have threaded the lights through the eye bolts and reached the desired length, secure the end of the string lights by tying them off or using zip ties. This will prevent them from unraveling or coming loose.
Q: How can I protect the string lights from weather damage?
A: While most outdoor string lights are designed to withstand various weather conditions, taking some precautions is always a good idea. Consider using outdoor-rated extension cords and waterproof connectors to protect the electrical connections. Additionally, during inclement weather, it’s advisable to take down the string lights temporarily to prevent damage.
Conclusion
Creating your own DIY string light pole doesn’t have to be expensive or complicated. With a few materials and a dash of creativity, you can transform your outdoor space into a magical oasis without breaking the bank. By following the step-by-step guide outlined in this article, you can craft a cheap and stylish string light pole that adds warmth and charm to any setting. So, gather your materials, unleash your imagination, and illuminate your surroundings with the enchanting glow of DIY string lights!
Remember, as you embark on this DIY project, prioritize safety and ensure that your electrical connections are secure. Always refer to the manufacturer’s instructions and guidelines for the specific products you are using. Now, it’s time to get started and bring a touch of brilliance to your outdoor space. Happy crafting!
Note: Always exercise caution and use proper safety measures when working with tools, electricity, and other potentially hazardous materials.